Most people consider that they have good posture, especially those who are active and care for and ride horses. But as we get older, and with the stresses of life, our posture can become compromised — and because the human body is so incredible, these changes are often gradual.
This means that we won’t necessarily realise that our posture has altered and is no longer considered to be ‘good’ posture.
The truth is, most people, including horse riders, will have a compromised posture. Understanding the posture type that most resembles your own type will provide insight into which muscles are compromised and are holding you back from your core functioning optimally both in and out of the saddle.
Correcting the function of these identified muscles through exercises should improve how your core functions and in turn improve a horse rider’s position. This is the starting point.
Once your body has a more correct posture, riding challenges should lessen, or disappear altogether.
Correct (optimal) posture
Optimal or correct posture is proper alignment of the spine and body. This is alignment that maintains the three normal curves in the cervical (neck), thoracic (upper part of the back) and lumber (lower part of the back) areas.
Anyone who doesn’t have the correct posture will most likely fall into one of the three most common posture types:
Kyphotic posture
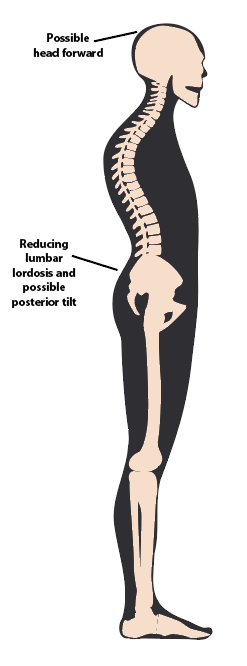
Kyphotic posture is an increased curvature of the thoracic (upper) part of the spine. The main cause is bad postural and lifestyle habits.
Other causes relate to genetic abnormalities or major trauma, injuries, or surgeries.
Horse riders with kyphotic posture have reduced lumbar lordosis and possible posterior tilt, and their head may be forward.
Muscles in the chest and shoulders will be tight/shortened, while muscles in the upper back and neck will be weak/lengthened.
Challenges for horse riders with this posture
Horse riders with kyphotic posture are likely to struggle with:
- Being reliant on the reins with their arms often straight and held downwards.
- Feeling behind the movement. Lower leg sits too far forward.
- Collapsing in up and down transitions.
- Always being told to sit up.
- Having rounded shoulders and unable to bring them backwards without discomfort.
- Pulling themselves forward and out of the saddle in trot, with knees on.
Lordotic posture
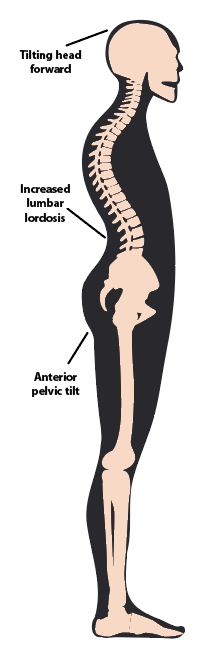
Lordotic posture involves an increased lumbar lordosis (curvature of the lower back) and increased anterior tilt of the pelvis (the pelvis tilts forward).
Due to the increased tilt of the pelvis, there is an increased flexion (bend) in the hip joints.
The main cause is bad posture and lifestyle habits. Other causes relate to major trauma, injuries, or surgeries.
Muscles in the hip flexor group and erector spinae group will be tight/shortened and muscles in the glutes, hamstrings and abdominals will be weak/lengthened.
Challenges for horse riders with this posture
People with this posture will often:
- Struggle to sit up and maintain their position in the saddle.
- Collapse through transitions, particularly downward ones.
- Hold their hands in a downward, fixed position.
- Lean forward in rising trot and canter.
- Have soreness and tension in the groin and inside the thigh due to excessive gripping.
- Be very easily unbalanced.
- Heels curl upward toward the bottom.
Sway back posture
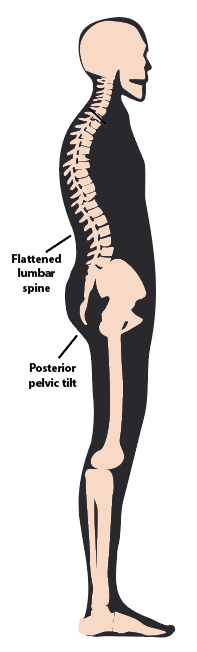
With a sway back posture there is an increase in the posterior tilt of the pelvis and the trunk with a thoracic kyphosis (rounding of the upper back).
The rider’s knees are often locked, with the front of the pelvis pushed forward, but the pelvis is rotated slightly backwards.
The main cause of sway back is bad posture and lifestyle habits. Other causes relate to genetic abnormalities or major trauma, injuries, or surgeries.
The hamstrings, abdominals and glutes are tight/shortened and the hip flexor group and erector spinae group are weak/lengthened.
Challenges for horse riders with this posture
These riders often struggle with:
- Being reliant on the reins, with arms straight and held downwards.
- Feeling behind the movement. Lower leg sits too far forward.
- Collapsing in up and down transitions.
- Trotting feeling clumsy and out of control.
- Excessive bouncing in trot before canter.
Pelvic tilts
Lordotic posture is associated with an anterior (front) pelvic tilt and sway back with a posterior pelvic tilt. A kyphotic posture may or may not have a pelvic tilt.
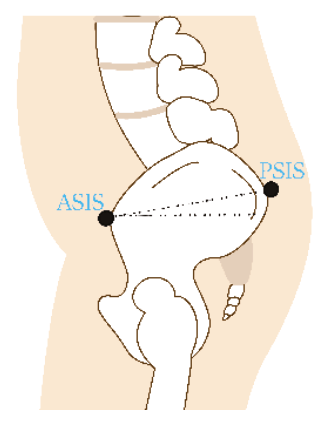
The tilt of the pelvis is determined by measuring the angle of the anterior superior iliac spine (ASIS) and the posterior superior iliac spine (PSIS).
These are bony structures on the front and back of the pelvis and can be felt with the fingers.
There are many considerations when measuring the range of the ASIS and PSIS. Generally, a neutral pelvis is when a straight line can pass from one to the other, or with a slight anterior (forward) angle of 7-10 degrees.
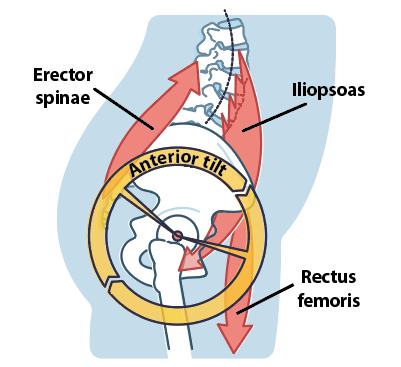
Tilting forward
An anterior pelvic tilt occurs when the pelvis is rotated forward, causing an increased curve in the lumbar (lower back) spine and the appearance of a bulging stomach.
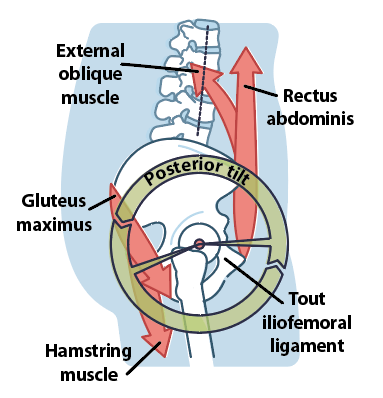
Tilting backwards
A posterior pelvic tilt occurs when the pelvis is rotated backwards. This causes the rider’s back to be pulled downwards, giving the appearance of a flat back and flat bottom.
How to assess your posture
To assess your posture, get someone to take a picture of you, or you could use the timer on your phone.
When you are ready, you should take three small jumps on the spot. When you land for the third time, don’t move at all until the photo is taken. This ensures that you don’t ‘position’ yourself for the photo.
Compare your photo with the diagrams above to see which best resembles your posture.
It is very important to note that if you don’t have an optimal posture, it doesn’t mean that there is something wrong with you.
Conditions associated with posture types have many symptoms other than posture. If in doubt, arrange to see a doctor.
Exercises to improve kyphotic posture
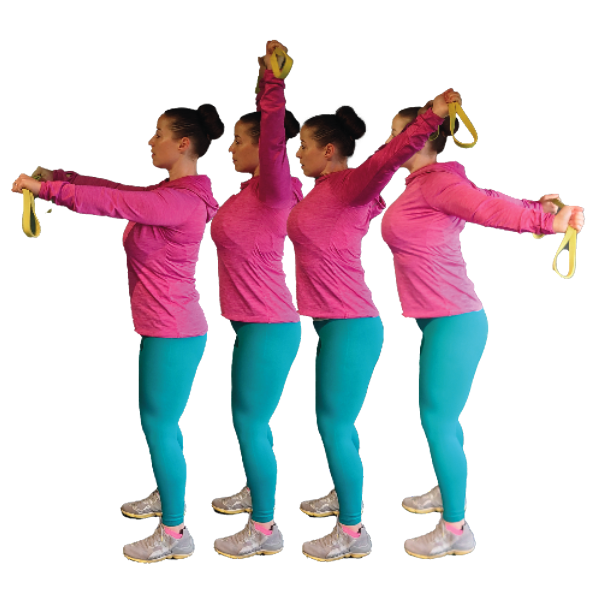
Resistance arm circles
NB You shouldn’t do this exercise if you have recently had a shoulder injury.
Stand with your feet a hip width apart.
Hold your arms straight out in front of you, holding a resistance band wider than shoulder width, with an overhand grip.
Lift your arms up and over your head, still holding the resistance band.
Bring your arms downwards behind your back.
Return your arms to the front.
If you can’t get your hands behind your back, take a wider grip on the band or do it without one.
If it feels too easy, take a smaller grip (narrower than shoulder width).
Common issues with this exercise include:
- Your arms getting stuck, which means you are unable to take your hands behind you due to chest tightness.
- One arm being straighter than the other. Both arms should be straight.
- The movement isn’t smooth.
- Your arms won’t go behind your back. In this case, take a wider grip on the band or do the exercise without one.
Resistance rows
With a staggered stance, place your forward foot in the centre of the band so that it is secure under your foot.
- Bend forward from the hip and hold the band firmly with your hand on the same side as the foot holding the band.
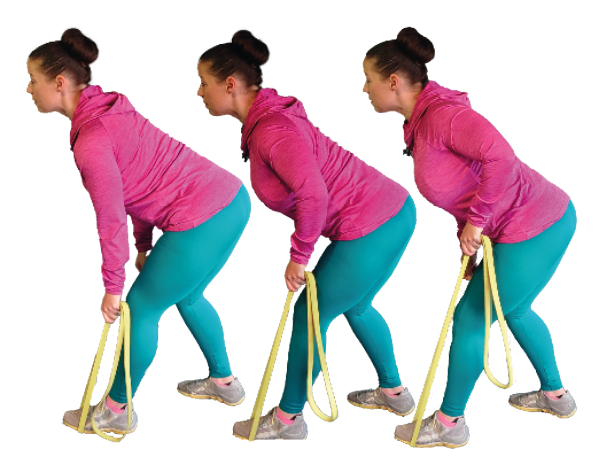
Common issues with this exercise include:
- Your back doesn’t remain straight throughout the movement, causing neck discomfort.
- You don’t have enough of a staggered stance, which will cause lower back discomfort.
- Your arm is brought outwards as well as backwards.
- Not keeping your shoulder back and allowing it to round forward.
Exercises to improve lordotic posture
Abdominal taps
Lay on the floor with your knees bent and your feet flat on the floor.
- Cross your hands over your chest and rest your thumbs lightly under your chin.
- In one smooth movement, lift your shoulders off the floor and bring your knees towards your chest. Don’t sit up.
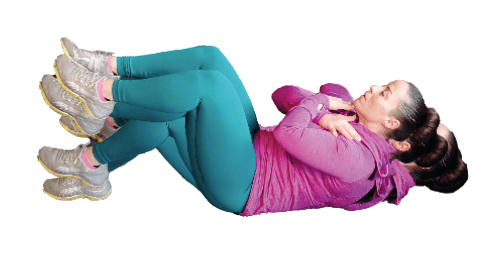
Common issues with this exercise include:
- Coming up too high into a sit up.
- Not lifting your shoulders off the floor and just curling your head.
- Lack of control during the movement.
Overhead squats
Stand with your legs a hip width apart or slightly wider.
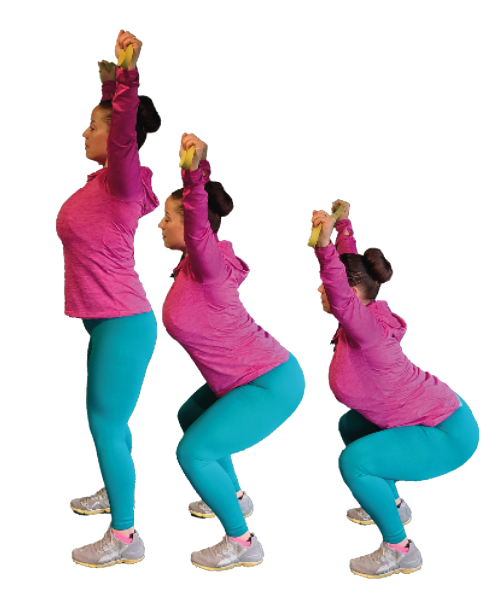
Common issues include:
- Lowering your body straight down instead of pushing the bottom backwards.
- Can’t keep the arms straight above the head.
- Collapsing forward during the squat and bringing the arms forward.
- A lack of depth in the squat.
- Lifting your heels off the floor.
- Knees collapsing inward on the downward movement.
- Balancing on the outside of your foot.
Exercises to improve sway back
Modified mountain climber
Start in the plank position; on your hands with straight arms and on your toes.
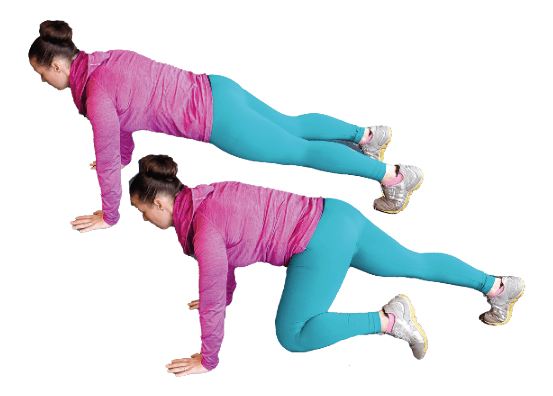
Common issues include:
- Going too fast and having no control through the movement.
- Having your bottom too high in the air.
- Hips dipping towards the floor.
- Collapsing through the shoulders.
Alternative reverse lunge
Stand with your feet together and take a medium step back with one foot.
- Repeat on the opposite side.

Common issues include:
- Not taking a big enough step back to accommodate the lunge.
- A lack of depth for the lunge towards the floor.
- Wobbling during the movement.
- Wobbling at the bottom of the lunge.
- Struggling to get out of the lunge position.
Number of repetitions
Perform both exercises for each posture type as a mini circuit.
Do 10 repetitions with good control and be aware of how you are doing the exercises, and then move on to the next one and do another 10 repetitions without a break.
After you have done both exercises, have a short break (under two minutes) and repeat for a total of four circuits.
This should be repeated three times a week only.
Many of the challenges riders experience in the saddle will be related to whether or not their core is functioning optimally.
These exercises will help you to start correcting your posture and get your core functioning optimally.
RiderCise
The Strong Rider Program is a six-month online programme that tackles the mindset, nutrition, and physical aspects to overcome the challenges that are holding riders back from being ‘the rider they want to be’. Find out more