With a bit of imagination, exercises involving poles on the ground can be good fun for horses and for riders. They don’t just put the horse’s body through its paces, but also their brain, and so provide an incredible all-round workout.
Poles on the ground can help to improve the rider’s performance in the saddle too. It can appeal to people who don’t want to jump, plus those who do. It can also be done in-hand, as well as on the back of a horse.
There are two types of polework. First there is the traditional kind, where the poles are lined up in a row. Then there is the more recent innovation of technical polework, where the patterns that can be made and the exercises undertaken are almost infinite — certainly enough to keep a rider and horse engaged for months, if not years.
I will share several pole exercises with you below which require only three or six poles, and will keep you engaged and entertained for hours.
Traditional pole exercises for horses
Riding a horse through rows of poles leads to the development of rhythm, balance and the regulation of stride length.
The downside is that mentally the horse isn’t always challenged as they can quickly learn the stride pattern.
It’s rather like a person walking up their own staircase — they know it so well that they can do it with their eyes closed. Additionally, you can only approach a line of poles from two directions, making it pretty constraining.
Technical pole exercises for horses
If located correctly in an arena, you can use the same technical polework layout for numerous exercises, approaching from various directions and in any of the three paces.
As for honing horses, technical pole exercises help them to be all of the following:
- More responsible for their own length of stride and so confident in their decisions that they can carry this forward to other areas of their working life, particularly jumping.
- More engaged in their brain and with better spatial awareness and coordination.
- More agile, because they have to be able to react more quickly to the challenge in front of them.
- Better connected from brain to feet.
- Better at staying on a narrow line, which will translate well to skinny fences on a cross-country course.
- Better able to increase their stride height as well as engage their core, plus it will make the horse more flexible and supple. They will also develop bend when working on curving lines.
- Better able to strengthen and develop muscles.
Benefits for riders
In terms of your own performance, polework can improve your focus, aids, reaction times and accuracy. This is because riding through the edge of a shape could mean your approach is mere inches wide rather than metres.
Remember at the beginning of every session, and also when introducing pole exercises to a horse for the first time, to ensure that they understand the question in an active walk first before progressing on to a faster pace.
In any case, walk is by far the most difficult pace for the horse doing polework. It brings no elevation and so they rely on muscular effort, meaning that it will help to hone them better than trot and canter.
Triangle poles
The following patterns are taken from my Polework Patterns app and are based on 3m poles. Ideally position your layout as close to X or the centre of your field or arena as you can, as this gives you the most options for using it in a variety of directions.
The triangle is popular because it uses so few poles, it doesn’t take up much room, it is quick to set up and it is versatile.
It can also be tackled in multiple directions. You can tackle the triangle in all three paces, or you can use it as a transition point — ie, walking in and trotting out — to help with upward and downward transitions.
There are easier configurations, but provided your horse has done a little polework they can tackle the triangle, either under saddle or in-hand.
Exercises with three poles
The following polework exercises require three poles on the ground.
Spoke configuration
Difficulty rating: 2/5
This configuration can be negotiated in all three paces, but make sure that before you attempt canter your horse is comfortable in walk and trot.
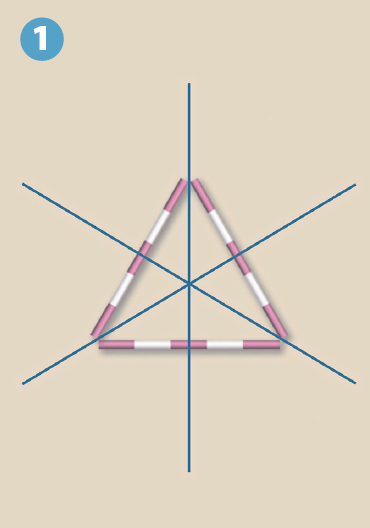
No matter which direction you approach the triangle, you will either ride over a base and out through a point, or you will come in through a point and out through a base.
The former is easier because it gives the horse a much bigger area to aim for on the approach, plus they will be stepping into a bigger space and so it will be less ‘claustrophobic’ for them.
Entering via a point, though, has its merits, not least because it tests the horse’s ability to stay on a narrow straight line.
The Pink Line
Difficulty rating: 2/5
This exercise should only be performed in walk and trot. The tricky thing is that even though you are riding a straight line, the poles you are negotiating are angled.
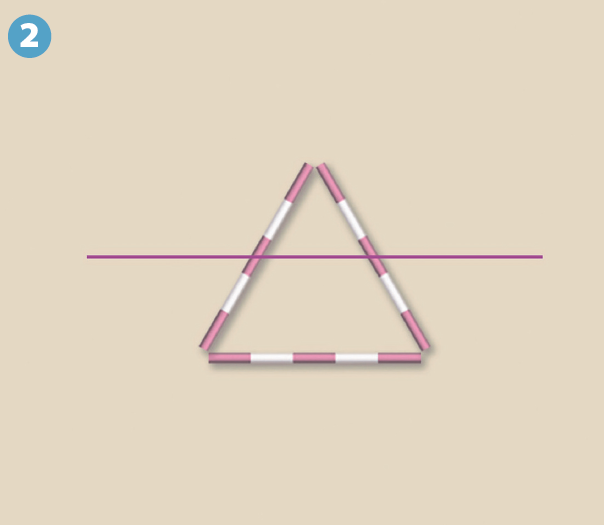
Horses don’t have the best eyesight and they find it more difficult to read an angled pole than a straight one and so they invariably put in more effort over an angled one. It basically has a raised pole effect.
Try intersecting the centre of the triangle to start with (slightly lower than the pink line shown) and use this as your base line.
You can then tweak your approach to give a shorter or a longer distance.
If you want to make the stride length between the poles shorter, turn off the track a stride earlier, or to make it longer, turn off the track a stride later.
It is the rider’s job to control speed and direction and check for any discrepancies, as well as set the horse up on the line, but ultimately it is the horse’s responsibility to negotiate the triangle.
The aim is for them to lengthen or shorten their stride without losing balance and rhythm. As they become more accomplished, the rider should do as little as possible in the saddle, leaving the horse to work out the stride length for themselves.
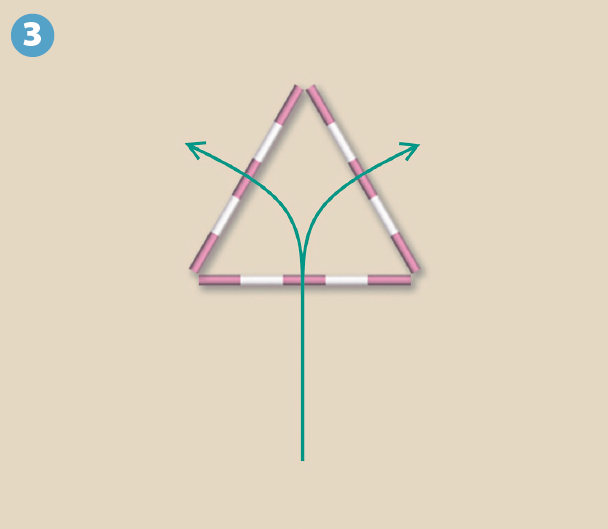
The Y Shape
Difficulty rating: 3/5 (in trot) 4/5 (in canter)
In this exercise you ride over the base of the triangle in a straight line and then either turn left or right on a bending line to exit.
It can be done in all paces, but always start off in walk, and bear in mind that this is an exceptionally difficult exercise to do in canter, even for experienced horses.
Because this is a trickier exercise than it looks, with a younger horse reduce the acuteness of the turn, for example by negotiating the base further to the left or to the right which will give them more room.
Meanwhile, do the opposite with a more experienced horse, making the angle of the turn more acute.
There is a lot of responsibility on the rider to communicate accurately where they want the horse to go.
This exercise helps to improve a horse’s bend and engagement and, because they are changing direction, it also helps to test and develop their balance and core.
Again, because you are angling the pole on exit, the horse will put in more effort.
Full circle
Difficulty rating: 2/5
This exercise involves riding small circles through any points of the triangle. It can be done in walk and trot.
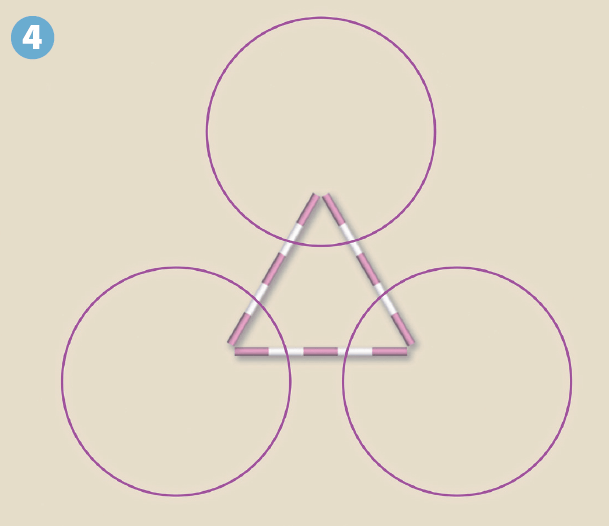
The angled poles will make the horse work harder. This exercise helps the horse with bend and engagement and it is good for developing spatial awareness because the horse has to step in and out of the triangle pretty rapidly.
It tests the rider because they will need to find the line that best suits their horse’s length of stride.
In fact, emphasis is on the rider to ride a correct, continuous circle.
Once the horse has become more accomplished, you can start to link some of the circles together, or mix them up.
For example, by trotting a three-quarter circle, doing a downward transition, walking over the poles and then trotting again.
Exercises with six poles
The next exercises require six poles made up into a C interlocking into an inverted C.
This configuration has almost limitless approaches, but I will detail four patterns from my Polework Patterns app that can be built into a schooling regime that will keep both horse and rider mentally and physically challenged.
The six-pole ‘mini maze’ featured here is a well known and popular exercise due to its versatility — all you need is imagination and a bit of common sense to tackle it.
One of the benefits of the layout is that to give the horse a good workout you don’t even need to go over the poles. It is great for in-hand work, plus some of the exercises can be tackled in all three paces.
Layout 1
Difficulty rating: 1/5
Despite this exercise seeming relatively simple, it is fairly complex. It is brilliant for coordination because the horse has to think about which foot to move first.
It also tests balance and lateral suppleness, including building up their core because they will need to use this to stabilise their body around the turns.
This is a walk only exercise, and a good 15-minute warm-up should precede it. There may be a temptation to think that with no poles to walk over the horse isn’t working hard, but they definitely are.

How to ride it
- Before approaching, ensure that the horse is attentive to your aids and focused on you.
Come in either from the top or the bottom of the grid, riding in a straight line and ensuring that the horse understands what is being asked.
If yours isn’t used to walking between poles and they start to feel claustrophobic, keep on walking forward over the pole in front.
The aim is to keep the exercise as stress free as possible. - Once inside the grid and as you go to turn, you need to communicate accurately your wishes as this is a small space for manoeuvring.
If you have a younger or a slightly unbalanced horse you can open up the grid slightly, pulling the C and the inverted C further apart so that there is more room. - Walk in and then slow the walk, asking the horse to make the tight turn. Think about stopping their back end and moving their front end — rather like a pirouette — until it is on the new trajectory.
- Also consider halting and turning and then halting and turning again at the second bend.
Bring the forehand around by opening your inside hand to invite the horse to look that way. Then close your outside hand and use your outside leg to instruct them to move their shoulders around. Repeat the aids for the second corner. - Turn your upper body to help influence the horse’s turn.
Top tip: take your time
Let your horse take their time in this exercise. Allow for mistakes and let them gain confidence over time as their understanding increases.
Don’t expect perfection at first, and don’t be hell-bent on keeping them inside the poles either.
If they need to step outside on occasions it isn’t the end of the world.
Repeat from both directions and, to make this a more complex test, consider adding in a second mini maze close to the first.
Layout 2
Difficulty rating: 1/5
We are introducing more bend here and so this exercise will work on the horse’s suppleness and rhythm, as well as the engagement of their hindleg.

How to ride it
- This exercise should only be performed in walk and trot. Canter should be avoided unless you are at a level where the horse can perform flying changes on the loops. Alternatively, once the horse is going well through the grid, try cantering along the straight sections and trot around the corners.
- When introducing the horse to this layout, make the loops as big as appropriate for their level of experience. The more educated they are, the smaller the loops can be.
- As you negotiate the straight part, nothing should change in terms of speed or rhythm. Therefore make sure that you have a good quality trot before you start and ensure that the pace is rhythmical and balanced. Ride through almost as though the poles aren’t there.
- Use the same aids as if you were riding a serpentine.
- On the approach, think about making an accurate bend and ensure that the horse bends around your inside leg.
- On the tight turn back, ensure that as well as using your inside leg and hand that you use your upper body. The upper body is a powerful turning aid. Also, on the turn, don’t allow your seat to slide to the outside of the saddle. This is another common problem and it will pull the horse out of balance.
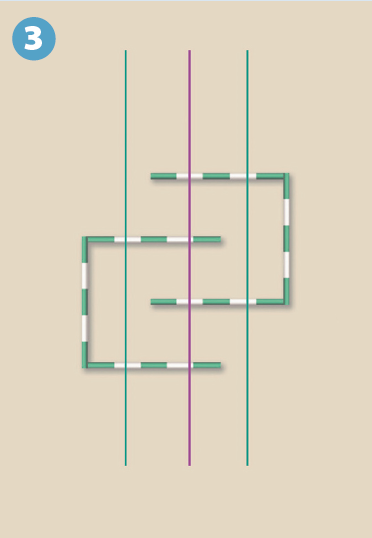
Layout 3
Difficulty rating: 2/5
This layout tests the horse’s rhythm and it will regulate their length of stride. It also tests straightness and the rider’s accuracy, not least because when riding the pink route the width being aimed at is less than 1m.
How to ride it
- The green lines (see diagram 3) show where this exercise can be tackled in all three paces. The pink route, which works like four trot poles, should only be negotiated in walk and trot.
- Approach from either direction, firstly in walk, but work out before you get to the poles where you are planning to present your horse.
- Establish the pace you want to use early on and ensure that it is as good quality as it can be, and maintain that quality through the grid.
- It is advisable to negotiate the green lines first, where you will find that the vertical pole to the side will keep your horse straight. Once you have ridden through in walk a few times and the horse understands the question, move up to trot and eventually canter. Never rush to move out of walk — after all, this is the pace that will test the horse the best anyway.
- Play around with linking the lines together. Once the horse is familiar with the layout, perhaps trot down the pink line, turn left or right and then canter up either one of the green lines.
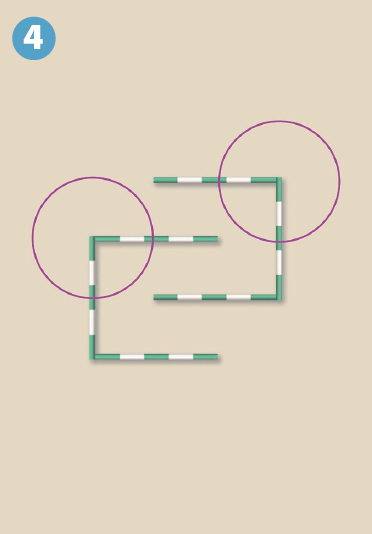
Layout 4
Difficulty rating: 2/5
This is a good coordination exercise because the horse has to go over the poles on a bending line, and judging the distance is likely to prove quite taxing. In terms of improvement, it helps the horse with bend, tests their balance and assists with suppleness and engagement as they step underneath with the inside hindleg.
This exercise can be ridden in walk and trot, but make sure you ride it multiple times in walk and have good results before going any faster.
How to ride it
- To ride a circle, negotiate the poles where they meet at right angles. There are four options on the grid to do this. For a young horse, make the circle bigger.
- Tackle the different options on both reins too and, as the horse gets proficient, link the circles together, which will really get those grey cells working.
- It is important not to let the horse drift out or fall in on the circle. They must stay correctly bent around your inside leg and you need to support them with your outside aids. Ensure that the horse has a true bend through their body and that they aren’t just bending through the neck. This is a big ask, though, so be patient.
- Once the horse is circling confidently, to up the ante perhaps intersperse circles with some of the lines in layouts 1, 2 and 3. Mix and match, not least if your mount is getting a little backward thinking or weary of circling.
Learning from pole exercises
In all of these pole exercises, it is the rider’s job to get their horse accurately to a point in the arena to tackle the exercise.
Bear in mind that some of the lines are intricate, so this won’t always be easy.
Technical pole patterns tests rider accuracy as well as communication skills, and you also have to learn to sit quietly on reaching the poles so that you don’t micromanage the horse through the exercise.
Don’t underestimate how tiring — physically and mentally — pole exercises are for horses.
Short sessions are best over several days, rather than one long one, not least because horses learn from repetition.
Whether you love dressage, jumping, hacking or something else, you’ll find that throwing a few poles down and riding a few different patterns will revitalise your sessions, whether ridden or in-hand.
All images and diagrams © Your Horse Library/Kelsey Media Ltd