There are four different types of trot: working, collected, extended and medium, and, in all cases, it is a two-time pace with the horse’s legs moving in diagonal pairs.
The two-time beat of trot should be evenly spaced — an uneven beat is a sign of lameness.
In trot, the horse’s legs move in the following order:
- Right hind and left fore together
- Suspension (when all hooves are off the ground)
- Left hind and right fore together
- Suspension (when all hooves are off the ground)
When assessing their trot, you’re looking for the horse to make loose, free, active steps in a regular rhythm. Being able to stay in a natural balance and showing suppleness over their back — this is commonly known as swinging — with hindquarters that are engaged (where the hindleg reaches under the horse’s body) is also important.
In the following video, dressage rider and trainer Emma Woolley from WSC Dressage shows the difference between each type of trot:
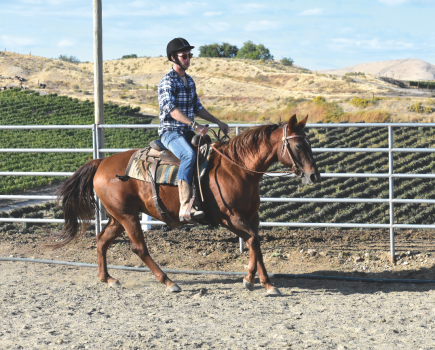
Working trot
Working trot is the most natural and efficient for a horse; it is also the easiest for them to achieve and maintain. This is why it’s the most ridden trot pace and it is seen in prelim and novice level dressage tests.
A good working trot needs to be established before training the horse in collected trot, which appears in elementary dressage tests and above.
Working trot is between collected and medium trot. Your horse should be in self-carriage, soft in the hand and working easily in an outline and in front of your leg in a willing manner.
They should swing through the back with active, rhythmical and balanced steps. The horse should track up (or over-track) in trot, which means the hind hooves step into (or slightly in front of) the hoof prints of the forelegs.
You will be asked to ride a range of movements in working trot in a dressage test, including circles and changes of rein at all levels. Your goal is to show loose, free, active working trot steps with the horse’s hocks pushing under their body with impulsion, elasticity and expression.
Developing working trot
The aim with working trot is not to rush your horse out of their rhythm, as it’s all about regularity and swing. Transitions are key to helping improve all aspects of this trot, such as teaching your horse to push in the upwards transition, stay in better self-carriage in the downwards transition, keep a regular rhythm and develop their balance.
It’s all about repetition. Do as many transitions as you can in each schooling session and, when you think you’ve done enough, do a few more. Walk to trot to walk, and halt to trot to halt are useful. Also, think about varying where you ask for the transitions, so your horse doesn’t start to anticipate.
Make some transitions quick, so you only stay in trot for a few strides, as this will engage your horse’s hindquarters. With other transitions, ride the full arena or a 20m circle before making the downward transition, as staying in trot for longer will help develop rhythm.
Ensure that when you ask for trot, your horse responds to the aids immediately. They should also come back to you quickly in the downwards transition.
Collected trot
Collected trot is first asked for in a dressage test at elementary level. It’s important not to think of collection as going slower. Instead, you’re containing the trot and making it shorter, but it must have the same energy, impulsion and elasticity as the working trot — it’s simply a more together and engaged version of the pace.
Your horse should remain in a correct outline and self-carriage but think of collected trot as allowing you to bring them more ‘up together’ so that they are working in a compressed frame with more energetic steps.
You’re encouraging the horse to lift through their shoulder, while the hind leg reaches under their body as they trot.
Only when the horse’s muscles are sufficiently conditioned is it possible to work towards collected (and medium) trot. This is because a strong core and muscular strength are required to maintain the shortened frame and lightened forehand.
Riding a correct collected trot is important as it’s much easier for your horse to do a 10m circle, shoulder-in and leg-yield, etc, in a short, quick gait. In effect you’re making their work easier.
However, collected trot is tiring for a horse and so should be interspersed with a few steps of medium or working trot at regular intervals.
Developing collected trot
It’s important not to slow your horse down when asking for collected trot. Instead, teach them to shorten their steps, but stay quick in the rhythm. As with a lot of training it’s all about transitions. Start by riding from trot to walk and then from trot to a ‘nearly walk’. Then ride forwards again and build on that.
Don’t stay in collected trot for too long, instead collect your horse for a few strides, then ride forwards again. As they get stronger you can ask for more collected steps. It’s better to do three or four good trot steps and then stop and praise the horse, instead of staying in collected until they get tired.
You’ll know when the collected trot is developing as you’ll feel as though you’ve suddenly found power steering: your horse will be lighter in front and easier to manoeuvre.
Medium trot
You’ll first encounter medium trot in novice tests, where you’ll be asked to show some medium trot strides. Medium trot shouldn’t be mistaken for going faster. You need to teach your horse to push and cover the ground by lengthening their strides rather than quickening them.
Allow your horse to come up and out to the contact, encouraging them to stay in self-carriage, otherwise they may fall onto the forehand.
By keeping the hind legs engaged and working into an upwards contact, it teaches the horse to push up to the bridle so that they stay in balance and in an even trot rhythm.
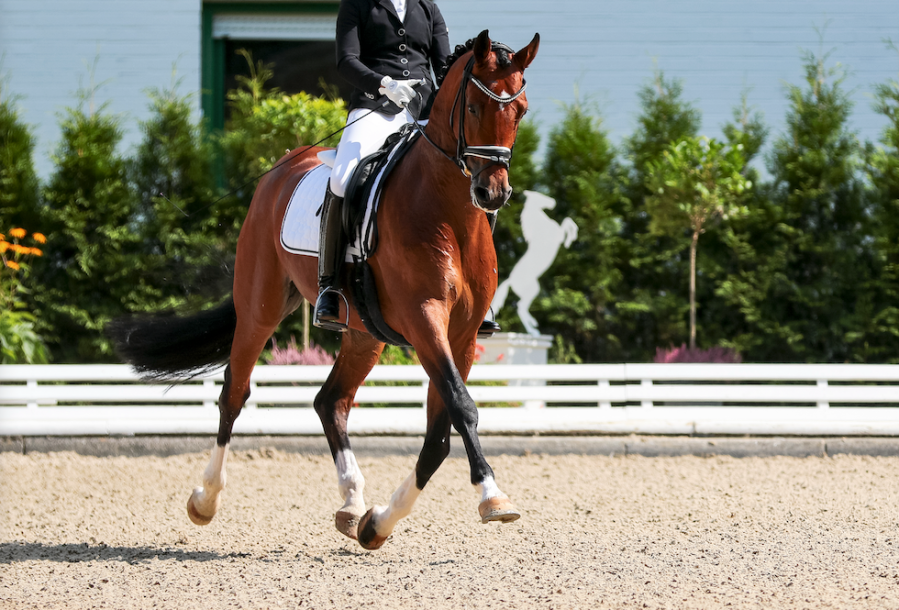
Extended trot
Extended trot is when the horse is at the full length of their stride, covering as much ground as possible. While maintaining cadence, the horse’s frame will lengthen with their weight being taken back onto the quarters while the forehand lifts. It should feel like a surge of power, but with the horse remaining light in your hand.
Extended trot is essentially the finished product of the medium trot strides. It is the same basis of the medium trot, just a bolder and braver pace.
Without hurrying, your horse should show a smooth transition at the start of the extended trot, lifting through the shoulders and pushing from behind into the extension.
The horse should stay in a regular rhythm, in balance, with their front and hind legs reaching equally forwards in the moment of extension. When they come out of the extension and back into a medium trot, the change should be smooth with no loss of balance or rhythm.
Next time you have an opportunity to watch a top-level competition horse do a dressage test, look out for their extended trot. An extended trot done well is very impressive.
According to Gillian Higgins, a BHS senior coach and sports and remedial therapist who founded Horses Inside Out, extended trot cannot be achieved until the horse is strong and their musculoskeletal system is mature.
“It requires an elongated frame, a strong core, muscular strength, power and elasticity,” she explains. “With this trot there is more spinal lateral flexion and rotation [in the horse’s back], a longer stride length, greater over-track and a longer moment of suspension.”
Developing extended trot
1 Think laterally
Exercises like leg yield and shoulder-in are good preparation for extended trot as they encourage the horse to engage their hindlegs while preventing them from running through the bridle. Lateral work also helps improve elasticity, which is vital to really open up the horse’s frame.
2 Less is more
Only ask for three or four extended trot strides at a time initially and then ask the hose to shorten again. This will prevent them falling onto the forehand, instead helping them to sit onto the quarters.
3 Mark the difference
Make sure you can show a clear change from medium to extended trot. Practise asking for and returning from extended trot at set points. When riding it in a test, avoid asking for extension straight out of a corner as it will be difficult for the judge to see a transition.
4 Keep control
If a horse gets too fast or the rider loses control during extended trot, they can get overexcited and boil over. Prevent this by regularly asking for slower transitions both within and between paces.
Why trot is so useful
Trot is a particularly useful pace and contributes to all of the following:
- Improving a horse’s rhythm.
- Assessing how symmetrical a horse is.
- Identifying lameness.
- Improving muscular strength, expression and cadence.
- Improving balance and core control.
- Recovery during hard or fast work, but returning to trot on a loose rein to let the horse’s muscles stretch, relax and recover.
- Covering long distances. While hot-blooded breeds like Thoroughbreds are natural gallopers, many others are not, including cobs and breeds native to the UK. They can maintain a good working trot for longer.
Rising trot
According to biomechanics specialist Dr Russell MacKechnie-Guire, who founded Centaur Biomechanics in 2006, riders are often taught that rising trot is an ‘up-down’ motion. However, this can be confusing.
“It’s better to think of rising to the trot as ‘sit and forward’,” says Russell. “It’s the momentum of your horse pushing themselves forward from their hindquarters that pushes your seat and hips forward and out of the saddle, followed by sitting gently back into the saddle.
“It’s important to keep your knees relaxed, your shoulders level and you should be sitting evenly on both seat bones. Your horse’s tail should also dissect you into two equal halves.”
Sitting trot
Some riders struggle with sitting trot and the main issue is tension, which causes you to bounce in the saddle. When this happens, most riders will slow the trot down to make it more comfortable to sit to.
“The key to perfecting your sitting trot comes back to your pelvis,” explains Russell. “It needs to move softly forwards and back in time to the trot while you maintain a secure yet supple core. You don’t want to become stiff and rigid in your position, because this will cause you to bounce.
“You also need to stay relaxed in your knees — any gripping in your legs will only make you bounce even more,” continues Russell. “To help you get the right feeling, think of gently polishing the seat of your saddle with your seat bones.”
Master sitting trot
Mastering the art of sitting trot takes time. Grand Prix dressage rider and trainer Sam Turner explains that the rider’s position and breathing are a big influence.
“I see many who are struggling with sitting trot because they aren’t lined up in their position. From a biomechanical point of view, you need to have a neutral pelvis,” states Sam.
“This is when your seat bones are pointing directly down towards the ground. Once you are in this position you can plug into your horse, so it’s much easier to follow their movement.”
Some riders grip with the back of their thighs and sit back slightly in sitting trot because it feels easier, but this is incorrect. When this happens, you’re driving your seat bones into your horse’s back.
“It’s a bit like jabbing your fingernails into your own back,” says Sam. “So then your horse drops their back and runs away. This results in you gripping too much with your thigh to try to stop yourself bouncing.”
Neutral pelvis
Your seat bones are the connection between you and your horse, and you want as much of your surface area attached to your horse as possible. The following exercise from Sam teaches you to be aware of where your seat bones are. Ask someone to hold your horse while you do this.
How to ride it
- Take your feet out of the stirrups.
- Lift your knees right up so they are in front of the pommel of your saddle (so you’re sitting a bit like a jockey).
- In this position, feel where your seat bones are, adjusting your position if necessary, so that they’re pointing downwards towards the ground.
- Keep this seat bone position as you slowly relax your legs down into the normal position.
- Take back your stirrups, maintaining a neutral pelvis.
It may take some practise to maintain this position while your horse is moving. If you feel yourself slipping back into old habits, repeat the exercise.
Don’t grip with your thigh
“A lot of riders grip with the back of their thigh in sitting trot to try to stop themselves bouncing. It’s that big muscle at the back of your thigh that you need to take off your saddle flap,” says Sam.
“When I’m teaching, I ask riders to think of the snow plough position in skiing or, if you’re not a skier, pigeon toe [this is where your toes point towards each other rather than forward].
“The aim is to encourage you to alter the position of your thigh so that the inside of it is gently on the saddle and the back of your thigh is off the saddle. This then allows you to support your own bodyweight, rather than gripping with the back of your thigh and sitting back.”
Relax your glutes
“Some people tighten up their glutes [the muscles in your bottom]. This is usually because they’re trying so hard that their buttocks are like two hard-boiled eggs, making it virtually impossible to ride a good sitting trot,” advises Sam.
“Try thinking about your bottom as a fried egg and just let everything relax. Obviously, you do need some tone, but if your glutes are too tight, you can’t expect your horse to bring their back up and trot in a rhythm.”
To solve the issue, you need to establish a level front and back, and a neutral pelvis.
“Your weight should run down your thigh, allowing you to support your own bodyweight. The back of your calf should be off the saddle, so your horse can move freely from behind,” adds Sam.
Main image of a horse in trot © Shutterstock. Video © Your Horse Library